Introduction to CSS
CSS stands for Cascading Style Sheets. It is a styling language that describes the presentation of HTML. In laymans terms, HTML provides the structure and the content of a website whereas CSS describes the look and feel of the site. One odd misconception that comes up once in a while is that some people think that HTML and CSS are the same thing. HTML and CSS are separate languages however they rely on one another and are thus often linked together in conjunction.
The main way of including CSS alongside an HTML file is by serving a separate CSS file to the HTML file of which your browser will read and serve accordingly. This is done by providing a <link> tag inside the <head> tag of your HTML code. This looks as follows:
<!DOCTYPE html>
<html lang="en">
<head>
    <link rel="stylesheet" href="style.css">        <!-- css file linked here -->
    <title>My Website</title>
</head>
<body>
    ...
</body>
The <link> tag indicates that you are associating a separate file alongside the given HTML file. The rel attribute indicates that this file is a stylesheet or in other words a CSS file. The href attribute refers to the hyperlink reference and is the path to the stylesheet file so that the HTML file can find it. When normally using CSS, the location of the CSS file does not matter however when using Flask, the stylesheet must be in a folder called static for Flask to use it properly
You may have seen another way to incorporate styles online which looks something like this:
<div style="background-color: green">
    this is a div with green background
</div>
Using the style attribute inside an HTML tag is called an inline style. Although this functionality is supported by HTML5, it is not recommended as it makes your code less modular and less maintainable over time. Suppose you had many tags in your code with inline styles and one day you wished to change them. If all of your tags have inline styles, it would be a nightmare to go back through your code and change everything. As a general rule of thumb, avoid inline styles wherever possible and also opt to include styles in an external CSS file.
Using CSS to Style HTML Documents
CSS works by associating various style attributes to certain elements of HTML code. CSS can be bound to the following HTML elements:
- Tags
- Classes
- Ids
- Everything
In order to use CSS, you name the element of which you want the CSS to be bound to followed by curly braces. Inside the braces, you list each style attribute you wish to change followed by a colon and the appropriate value you wish to give to the style attribute ending with a semicolon. All together it looks something like this:
/* everything here applies to the <body> tag */
/* additional note: comments in CSS can only be done as follows and do not work with // */
body {
    background-color: green;
    font-size: 16px;
    margin-top: 1em;
}
In the above example, I bind the following styles to the <body> tag so that these attributes are associated with everything that has a <body> tag. As mentioned before, we can bind CSS to both classes and ids. The advantage of this is having some tags have a specific style while other tags may not have a specific style. This looks as follows:
/* styling a particular class -- in this case, the class is called "header" */
/* indicate classes with a "." in front of their name */
.header {
    font-size: 32px;
    font-weight: bold;
    color: yellow;
}

/* styling a particular id -- in this case, the id is called "card" */
/* indicate ids with a "#" in front of their name */
#card {
    padding: 15px;
    background-color: teal;
    color: white;
    margin-top: 10px;
}
To use these styles in HTML, we can just use the classes and IDs as we normally would:
<div id="card">this will be a teal coloured box</div>
<p class="header">this is some bold yellow large text</p>
Finally, there exists a wildcard operator that applies CSS to everything in the HTML document. This is usually used for global styles such as a font size, font family, font color, etc…
* {
    background-color: magenta;
    color: yellow;
    font-family: Comic Sans MS;
}
The CSS Box Model
Every element in HTML is made of a box that wraps around the element. Each box is made up of four properties as shown below:

Properties:
- Margin: the area outside of the border; this area is transparent
- Border: the area on the outskirts of the content
- Padding: the area between the border and the content; this area is transparent
- Content: the area where your actual content goes (e.g. text, images, other divs, …)
In order to change the style of any element, you must manipulate the appropriate element of the box model (those CSS properties being margin, border, padding, and the various properties associated with the content)
Common CSS Properties
Like in the HTML lab, it is not expected of you to remember every single CSS property however you will become more comfortable and remember more the more you use them. As stated before, frontend development is a very try-and-search type of task and you will often have to try things out and search for them on Google to find the solution. Particularly with CSS, many of the properties are not particularly intuitive and you will mostly have to search for things yourself online to help find the answer.
The following is a list of common CSS properties that you may find useful to you:
| Property | Description | Values |
|---|---|---|
background-color |
Sets the background color of an element | color-rgb, color-hex, color-name, transparent |
border |
Sets the border around an element | border-width, border-style, border-color |
visibility |
Sets if an element should be visible or not | visible, hidden collapse |
float |
Sets where an image or a text will appear in another element | left, right, none |
width, height |
Sets dimensions of an element | none, length, % |
font-family |
Sets the font type of an element | Many to find online… |
font-size |
Sets the size of the font | %, px, … |
font-weight |
Sets how bold font should be | normal, bold, bolder, 100, 200, … |
margin |
Sets the space outside of an element’s borders | auto, length, % |
padding |
Sets the space inside of an element’s borders | auto, length, % |
color |
Sets the color of text (not the color of the background!) | color-rgb, color-hex, color-name, transparent |
text-align |
Sets the alignment of text | left, right, center, justify |
text-decoration |
Adds decorations to text (note: bold is not considered a decoration) | underline, strikethrough, blink, … |
text-transform |
Controls the letters of an element | uppercase, lowercase, capitalize, none |
cursor |
Sets the type of cursor to be displayed | default, pointer, crosshair, move, … |
One additional thing to note is that the CSS properties must be spelled exactly the way they are listed. Like HTML, CSS will not complain or throw any errors if it is incorrect and your browser will not give any indication as to what is wrong with your code
Exercise
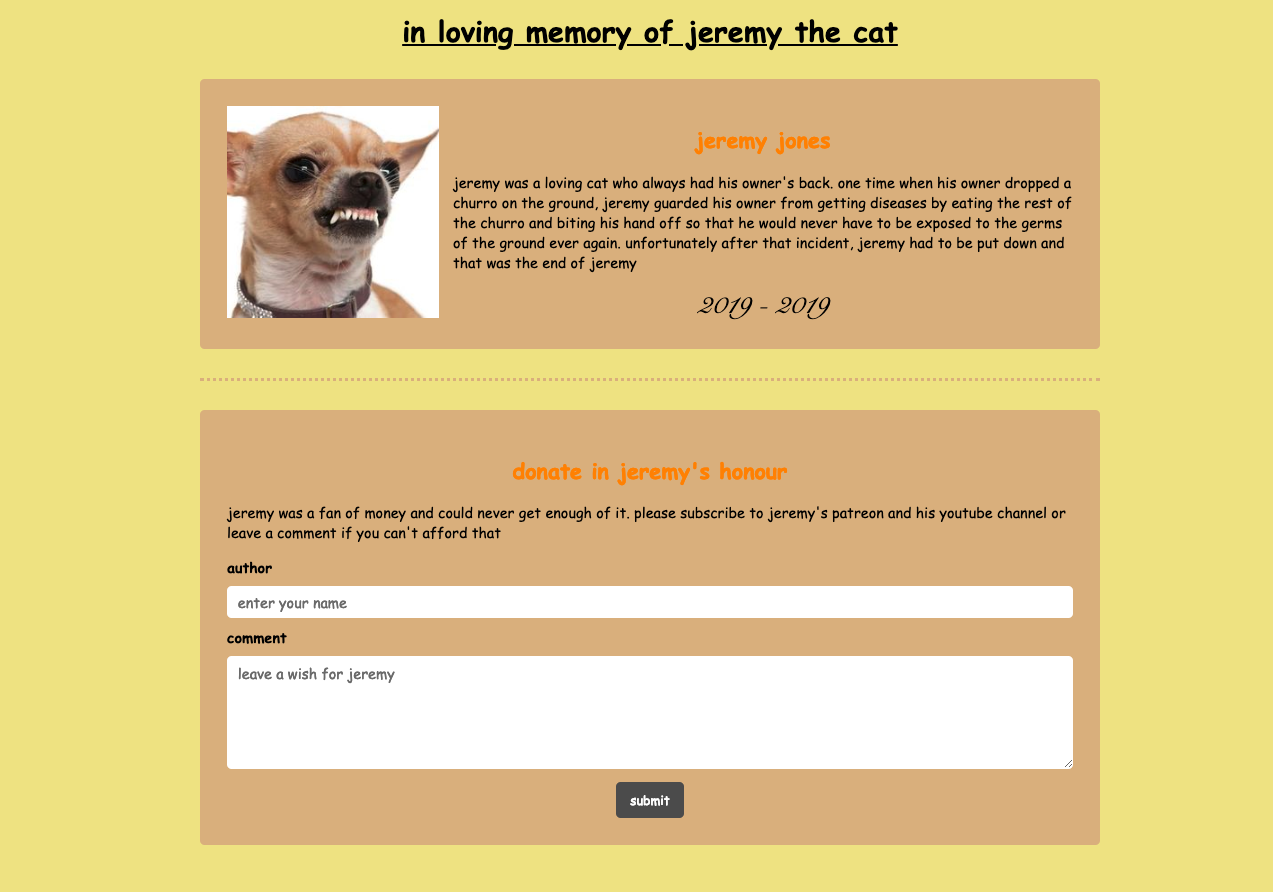
Jeremy is a cat that recently passed away. To help out his family, you will create an obituary page for Jeremy. Jeremy hated ugly websites so he’s counting on you to make a killer CSS for his obituary in honor of his life.
There are a couple elements you need to include in the obituary for Jeremy to be satisfied:
- A title of the obituary in honor of Jeremy Jones
- A colour scheme fit for Jeremy
- Jeremy’s three favourite colours were
#F0E68C,#FF8C00, and#DEB887so include them somewhere for Jeremy to see (if he were alive)
- Jeremy’s three favourite colours were
- Two main “sections”
- An “obituary” seciton that goes over Jeremys’ life
- Jeremy’s name
- An overview of Jeremy’s life and how he passed
- A picture of Jeremy aligned next to the text
- Jeremy’s birth and death dates in some fancy font
- The “donation” section since Jeremy loved money
- A description of the section
- A form for viewers to donate money or leave a wish for Jeremy
- A button to submit (this will not submit anything, we are just making the design)
- An “obituary” seciton that goes over Jeremys’ life
An example of a final product could be something like this:
Some ideas you might consider to try and make your styles more interesting:
- Try making the corners of the
<div>rounded as shown in the picture - Instead of having the background be a solid colour, you can actually change the background to be an image or a pattern
- Try making a shadow behind the
<div>to give the obituary some depth - Try varying the fonts between the different text sections (e.g. give the header and the actual text a different font)
Try to go above and beyond what is asked of you in this exercise to make an obituary that is unique and that Jeremy would be proud of biting his owner’s hand for