NOTE
For this week’s lab, you will need your own computer. It is not possible to install Flask on the lab computers and there currently isn’t a solution to run your code in the lab. If you do not have your own computer or did not bring your own computer this week, consider working with a partner for this week’s lab
Introduction to Flask
Flask is described as “microframework” for Python. It consists of a collection of tools that help to aid the web development process and alleviate many of the hardships of vanilla web development.
Flask is fairly easy to install on Python using pip the package manager for Python. pip should come preinstalled with Python if you are using Python 2 >= 2.79 (not recommended) or Python 3 >= 3.4 (recommended) however if you do not have it installed (i.e. running pip encounters an error), you can install it manually.
The easiest way to install pip if you do not have it is to re-install Python with the newest version (version 3.7 at the time of writing). I highly recommend you try to do this first because the installation process is pretty convoluted on most platforms. You can do so by downloading the latest version of Python here. After the installation, you should have pip installed. If you still do not have pip installed, try the following:
Windows Instructions:
- Download the
get-pip.pyfile from here- This should open a bunch of text. Right click on the page and click Save As to save the file. Save it somewhere easily accessible
- On Command Prompt, navigate to the folder where you saved
get-pip.py- The change directory command on Windows is
dir. It operates the same ascdon a UNIX-based computer - You can sometimes right-click on the current directory to open a command prompt to avoid changing directories through Command Prompt (however this usually does not work unless you’ve explicitly enabled it)
- The change directory command on Windows is
- Run
python get-pip.pyto installpip - Run
python -m pip install -U pipto upgrade to the latest version
Mac / Linux Instructions:
- Run the following two commands:
sudo python -m ensurepipsudo pip install -U pip
IMPORTANT NOTE:
pipcannot be installed on the lab computers as it requires higher-level privileges. It is highly suggested at this point forward that you use your personal computer. Doing any of the preceding instructions on a lab computer WILL NOT WORK
If you are still struggling to install pip at this point please ask a TA for help
When you have pip installed, installing Flask is very easy. On any platform, run the following command: pip install Flask
- If you are on Mac or Linux and this doesn’t work, try
sudo pip install Flaskinstead
Outside of Flask, pip is very useful as it gives you the power to download and install many potentially useful packages that you might choose to use later on
Starting a Flask app
A basic Flask app is structured as follows:
/home/my-flask-app/
|___ app.py
|___ templates/
     |___ base.html
|___ static/
     |___ style.css
Where /home/my-flask-app would be the directory of your Flask application
The file app.py is your “main” file and is what runs the app. In order to start you application, you can run python app.py or python3 app.py depending on your Python version. This will open up your application at http://localhost:5000
The two main directories to focus on are the following:
templates/- This folder contains all the HTML templates for what you will serve to the browser (i.e. what the user will see)
- Flask expects HTML files to be in a folder called
templates/so ensure your folder is named appropriately- If this is named improperly,
render_template()will not work
- If this is named improperly,
static/- This folder contains all of the static, non-changing elements of the site (i.e. such as the CSS / JavaScript)
- If you choose to write CSS, you would place it in this folder
- We will not focus on CSS in this lab
Your basic barebones app.py file will looks as follows:
# required imports; you may add more in the future; currently, we will only use render_template
from flask import Flask, render_template

# tells Flask that "this" is the current running app
app = Flask(__name__)

# setup the default route
# this is the page the site will load by default (i.e. like the home page)
@app.route('/')
def root():
    # tells Flask to render the HTML page called index.html
    return render_template('index.html')

# run the app when app.py is run
if __name__ == '__main__':
    app.run()
Getting Input From a Form
Flask can send data to app.py from the browser (i.e. from the HTML page) using something called an HTTP request. The exact details of the request will be discussed later in lecture. In order to receive data from the web page, Flask receives a GET request from a <form></form> block whenever the user press the corresponding <input type="submit"></input> button. A block in a webpage that can send input to Flask looks as follows:
<form action="/add-comment">
    <input type="text" name="comment-input" placeholder="enter a new comment">
    <input type="submit" name="comment-submit" value="submit">
</form>
NOTE: the GET request is not supposed to be used to modify data (this is a violation of the standard); don’t worry about this for now but in a later lab we will improve this example by refactoring this
Flask automatically sends a GET request to the endpoint provided in the action attribute inside the <form></form> tag. We can catch this particular endpoint in app.py by specifying it using app.route('/add-comment') or substituting /add-comment for any other endpoint you may decide to use.
To get the input the user has submitted, we make use of a module of Flask called requests. requests searches for any <input></input> tags inside the corresponding <form></form> tags and captures these values. To access them, in app.py we can using request.args.get('comment-input') as follows:
@app.route('/add-comment')
def add_comment():
    global comments
    comments.append(request.args.get('comment-input')
    ...
The request.args.get() command returns the value inside the input that matches the name attribute inside the <input></input> tags. Notice how comment-input matches the corresponding value in the HTML code
Additionally, notice how the variable comments is referred to using the global keyword. This is Python syntax for creating a global variable for the comments outside of the add_comment() function (you will see this in the starter code). Generally, this practice of using global variables is not recommended but we will refactor this later when we’ll use an SQLite database instead of a global variable
To use send data from Flask to the browser, we can pass in additional parameters to the render_template() function. Consider the sample code from Abbas’s app.py (from Quercus – Week 5 material):
@app.route('/')
def root():
    return render_template('home.html',data=posts, title="abbas")
The browser is now able to access these variables using the keys they were given (e.g. the key data will return the posts list and the key title will return the string abbas)
Tutorial Exercise
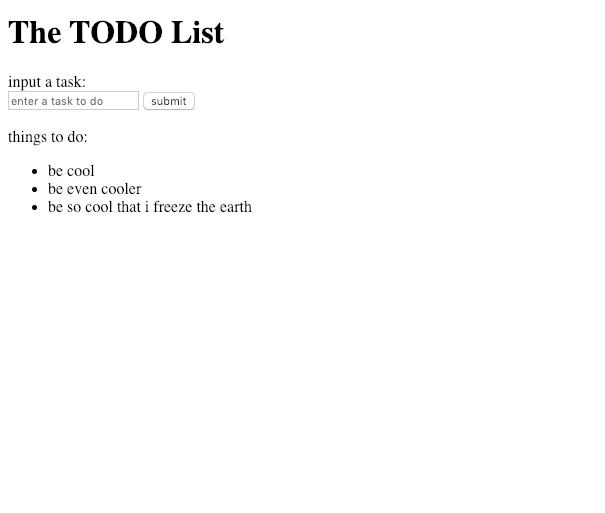
Your task for this week’s tutorial is to make a TODO list. The TODO list will have an input for and a button. Upon providing input and pressing the button, the page will display the user’s input in a table below. Download the sample code for this exercise here
The provided sample code is in the following structure:
/week6-lab/
|___ app.py
|___ templates/
     |___ index.html
|___ static/
     |___ style.css
In summary, your tasks are as follows:
- Complete
app.py- Finish the appropriate routing
- Complete the TODO logic
- i.e. when a user inputs a TODO, the table updates appropriately
- Complete the areas specified in the comments
- Complete
index.html- Complete the areas specified in the comments
- BONUS: look at and consider extending the file
styles.css
The end result should look something like this:
Some tips before you get started:
- Write your code in Visual Studio Code. It will make your life much easier when it comes to writing HTML code
- Make sure that your attributes are named correctly
- If you are trying to use
request.args.get(), ensure that your input tags have thenameattribute with the matching name - Make sure
app.route()matches theactionattribute in the form tags
- If you are trying to use
- Make sure that you have the correct directory structure
- Do not modify the directory structure of the starter code, it should be sufficient for this week’s exercise