Views
A view is a result set of a stored query. Think of it as a subset of a table or a snapshot (i.e. a view) into a table.
Views have several advantages in the real world:
- A view can hide certain columns from a table. This is useful if you want want users to see certain columns but not others (e.g. employees should be able to see each others’ phone numbers but not their salaries)
- Can provide time savings in writing queries by having a group of frequently accessed tables joined together in a view
- Provide more ways to manipulate data and easily get the information you are looking for
The syntax to create a view in SQLite is as follows:
CREATE VIEW view_name AS
    SELECT columns
    FROM tables
    [WHERE conditions];
Notice how the view is essentially a SELECT statement on a pre-existing table
For the following exercises, we will be using this database. We will be using the employees relation. You can see the schema of this relation using the SQLite browser or the command .schema employees
Exercises:
- Create a view called
Calgary_Employeesof all employees whose city isCalgary - Create a view called
Managersof all employees who are some sort of manager- To find a title containing the word “Manager”, you can use the
LIKEkeyword:SELECT * FROM table WHERE column LIKE '%string%'
- To find a title containing the word “Manager”, you can use the
- Create a view called
Small_Employeethat is the same as theEmployeetable but only contains the following columns:EmployeeIdFirstNameLastNameTitlePhoneEmail
GROUP BY
GROUP BY is an optional clause in the SELECT statement that returns one row for each group. For each group, you can apply an aggregate function (such as MIN, MAX, SUM, COUNT, or AVG) to provide more information about each group
The syntax for a sample GROUP BY clause is as follows:
SELECT
    column_1,
    aggregate_function(column_2)
FROM
    table
GROUP BY
    column_1,
    column_2;
The GROUP BY clause has an optional keyword HAVING that allows you to filter for a condition for a group or an aggregate. A typical example is filtering a COUNT() operation using something like ... HAVING COUNT(column) < 15 An example is as follows:
SELECT
    column_1,
    aggregate_function (column_2)
FROM
    table
GROUP_BY
    column_1
HAVING
    search_condition;
For the following exercises, we will use the above mentioned database file but we will use the tracks and albums relations instead. You can see the schemas of these relations using the SQLite browser or the commands .schema tracks and .schema albums
Exercises:
- Return the result set containing the album ID and number of tracks per album for every album ID in the relation
- Do the same as above but order the groups in descending order
- You can do this using the
ORDER BYclause and theDESCparameter
- You can do this using the
- Do the same as above but include the album title as well
- HINT: you will have to do an
INNER JOIN
- HINT: you will have to do an
- Do the same as above but only return records where
trackid > 15
HTML
HTML stands for HyperText Markup Language. It is a formatting system used by browsers to render the webpages we see on the internet
There is no “one” program to write HTML in so it is suggested you use some sort of text editor. I recommend using Visual Studio Code which comes pre-installed on the lab computers for you to use.
HTML code is made up of elements called tags that denote the structure of a webpage. A basic HTML web page looks as follows:
<!DOCTYPE html>
<html>
    <head>
        <title>My Website</title>
    </head>
    <body>
        <p>This is a paragraph</p>
    </body>
</html>
A basic description of the above tags:
<!DOCTYPE html>: this is here for legacy reasons; it mostly does nothing but when omitted some old browsers use a rendering mode that is incompatible with some specifications; although it appears useless, it is necessary for any HTML file you produce<html>: tells the browser this is an HTML document; its the container for all the other HTML elements (except the<!DOCTYPE>tag)<head>: container for all the head elements (i.e. scripts, styles, meta information, …)<title>: the name of the website; this will be shown in the “tab” on your browser<body>: the meat and potatoes of the website; this is where you will put all the “visual” elements<p>: a paragraph tag; indicates that you are writing a paragraph
Some basic tags that you will use for this exercise include:
- Headings:
- Range from
<h1>to<h6>; generally used for titles - Example:
<h1>keviniscool</h1>
- Range from
- Anchor:
- Link to other HTML pages or websites
- Example:
<a href="https://www.google.ca">this is a link</a>
- Images:
- Display an image
- Example:
<img src="dog.jpg" alt="this is a dog", width="420" height="69" />
- Lists:
- There are two types of lists denoted by the outside tags
- The inner tags
<li>are the list items
- The inner tags
- There are two types of lists denoted by the outside tags
<!-- this is an unordered list; it will be displayed with bullets -->
<ul>
    <li>kevin</li>
    <li>is</li>
    <li>cool</li>
</ul>

<!-- this is an ordered list; it will be displayed with numbers -->
<ol>
    <li>kevin</li>
    <li>is</li>
    <li>cool</li>
<ol>
Some tags contain information inside the leading tag (the first tag) called attributes. Some tags don’t have any attributes at all and some have a range of varying optional attributes. You do not have to remember all attributes however you should remember some of the main ones (e.g. attributes of <img> and <a>). If you need to find the attribute of a given tag, you should use Google
HTML contains structures called tables used for organizing information. An example table is defined as follows:
<table>                             <!-- the table tag indicates a table being created -->
  <tr>                              <!-- indicates a table row -->
    <th>Firstname</th>              <!-- th indicates a table header; it will be bolded -->
    <th>Lastname</th>
    <th>Age</th>
  </tr>
  <tr>
    <td>Jill</td>                   <!-- td indicates table data; it will not be bolded -->
    <td>Smith</td>
    <td>50</td>
  </tr>
  <tr>
    <td>Eve</td>
    <td>Jackson</td>
    <td>94</td>
  </tr>
</table>
Exercise:
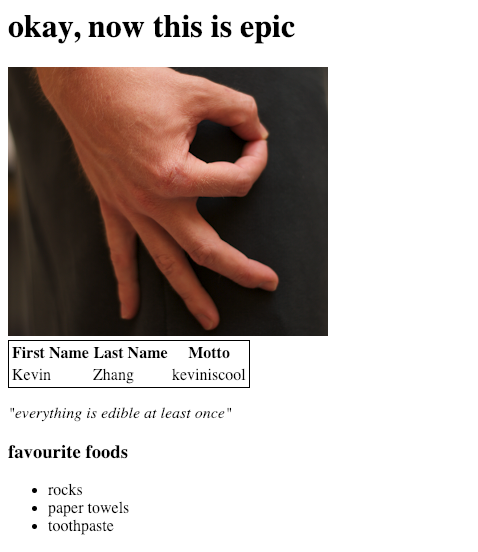
Make a small “blog” page about yourself. The blog must contain the following components:
- A title at the top with the name of your blog
- An image to represent your blog (can be anything; doesn’t have to be of yourself)
- A table containing the following information:
- Your first name
- Your last name
- A motto to describe yourself
- A paragraph with your favourite quote
- A list of your favourite foods
- OPTIONAL: style your website using the
styleattribute (we will discuss CSS next tutorial; if you know CSS already, feel free to decorate your blog however you’d like)
In the end, it should look something like this:
Feel free to add more to your blog to personalize it how you see fit
Note
HTML (and web development in general) is mostly learned through a “do-and-search” ideology. What this means is that you will mostly imagine something you wish to accomplish, search it up on Google, and look for people who have done what you’re looking for to complete your goal. Make sure to use Google and your TAs as resources to help you when you need help